Hashicorp Consul 103 - Secure agent communication using TLS encryption

In previous course (Hashicorp Consul 102), we secure the communication between the 5 Consul servers of our cluster. In this course, we will learn how to use TLS to verify the authenticity of servers and clients.
To better understand how this works in practice, let’s consider a hypothetical scenario with a company named Acme. We will use a docker-compose stack to quickly set up resources without the need of deploying a complete infrastructure. Stack template is available on Github:
 jeremychauvet
Step 1 - Create a Certificate Authority (CA)
Using TLS with Consul require to use a certificate signed by the same Certificate Authority (CA) across the nodes of the cluster.
Lets start this course by starting our Consul cluster with 5 servers:
# Path: showroom-hashicorp-consul/103_tls_encryption/start-state
$ docker-compose up -d
You can now login to one of the container, and start creating the Certificate Authority:
# Path: showroom-hashicorp-consul/103_tls_encryption/start-state
$ docker-compose exec -it consul-server-1 sh
$ cd /consul/certificates/
$ /consul/certificates # consul tls ca create
==> Saved consul-agent-ca.pem
==> Saved consul-agent-ca-key.pem
The CA certificate, named consul-agent-ca.pem, holds the public key crucial for validating Consul certificates. This certificate must be shared with every node operating a Consul agent.
On the other hand, the CA key, named consul-agent-ca-key.pem, is used for signing certificates for Consul nodes and must remain confidential. Control of this key enables one to operate Consul as a trusted server, create new legitimate certificates for the datacenter, and gain access to all Consul information, including ACL tokens.
Step 2 - Create certificate for the servers
As our CA is now created, let's sign certificates to use by the servers of the clusters:
# Path: showroom-hashicorp-consul/103_tls_encryption/start-state
$ docker-compose exec -it consul-server-1 sh
$ cd /consul/certificates/
$ /consul/certificates # consul tls cert create -server -dc dc1
==> WARNING: Server Certificates grants authority to become a
    server and access all state in the cluster including root keys
    and all ACL tokens. Do not distribute them to production hosts
    that are not server nodes. Store them as securely as CA keys.
==> Using consul-agent-ca.pem and consul-agent-ca-key.pem
==> Saved dc1-server-consul-0.pem
==> Saved dc1-server-consul-0-key.pem
$ /consul/certificates # chown -R consul:consul *.pem
The cert and key files as been now created. We can now change the server configuration to use it.
Step 3 - Use TLS
All servers are already configured in the docker-compose.yml declaration file to use the path where the certificates has been exported. However, we must update the servers configuration file to use the following new settings:
verify_incoming: ensure communication between servers and clients is verified.verify_outgoing: ensure communication between servers and clients is verified.verify_server_hostname: only agents that provide the certificate are allowed to boot as a server, preventing an attacker to compromise a Consul client agent and restart it as a Server to get access to all the datacenter data.ca_file: CA certificate.cert_file: Consul server public certificate to be used in thedc1datacenter.key_file: Consul server private certificate to be used in thedc1datacenter.auto_encrypt: use auto-encryption to distribute the client certificates.
# Path: showroom-hashicorp-consul/103_tls_encryption/start-state/config/consul-server-1-config.json

{
  "node_name": "consul-server-1",
  "server": true,
  "bootstrap": true,
  "retry_join": [
    "consul-server-1",
    "consul-server-2",
    "consul-server-3",
    "consul-server-4",
    "consul-server-5"
  ],
  "ui_config": {
    "enabled": true
  },
  "datacenter": "dc1",
  "data_dir": "/consul/data",
  "addresses": {
    "http": "0.0.0.0"
  },
  "encrypt": "7Rqzack5azTHV0i6dT0wul8fp92+aWxadgv6S3f1zsc=",
  "encrypt_verify_incoming": true,
  "encrypt_verify_outgoing": true,
  "verify_incoming": true,
  "verify_outgoing": true,
  "verify_server_hostname": true,
  "ca_file": "/consul/certificates/consul-agent-ca.pem",
  "cert_file": "/consul/certificates/dc1-server-consul-0.pem",
  "key_file": "/consul/certificates/dc1-server-consul-0-key.pem",
  "auto_encrypt": {
    "allow_tls": true
  }
}
consul-server-1 configuration is now ready to rollout. Let's restart the Consul agent using docker-compose:
# Path: showroom-hashicorp-consul/103_tls_encryption/start-state
$ docker-compose stop consul-server-1
[+] Stopping 1/1
 ✔ Container consul-server-1  Stopped
$ docker-compose up -d consul-server-1
[+] Running 1/1
 ✔ Container consul-server-1  Started
This stop and start step must be done for all servers after configuration has been updated.
Access consul-server-1 console using the following address: http://localhost:8501. All the nodes of the cluster must be displayed:
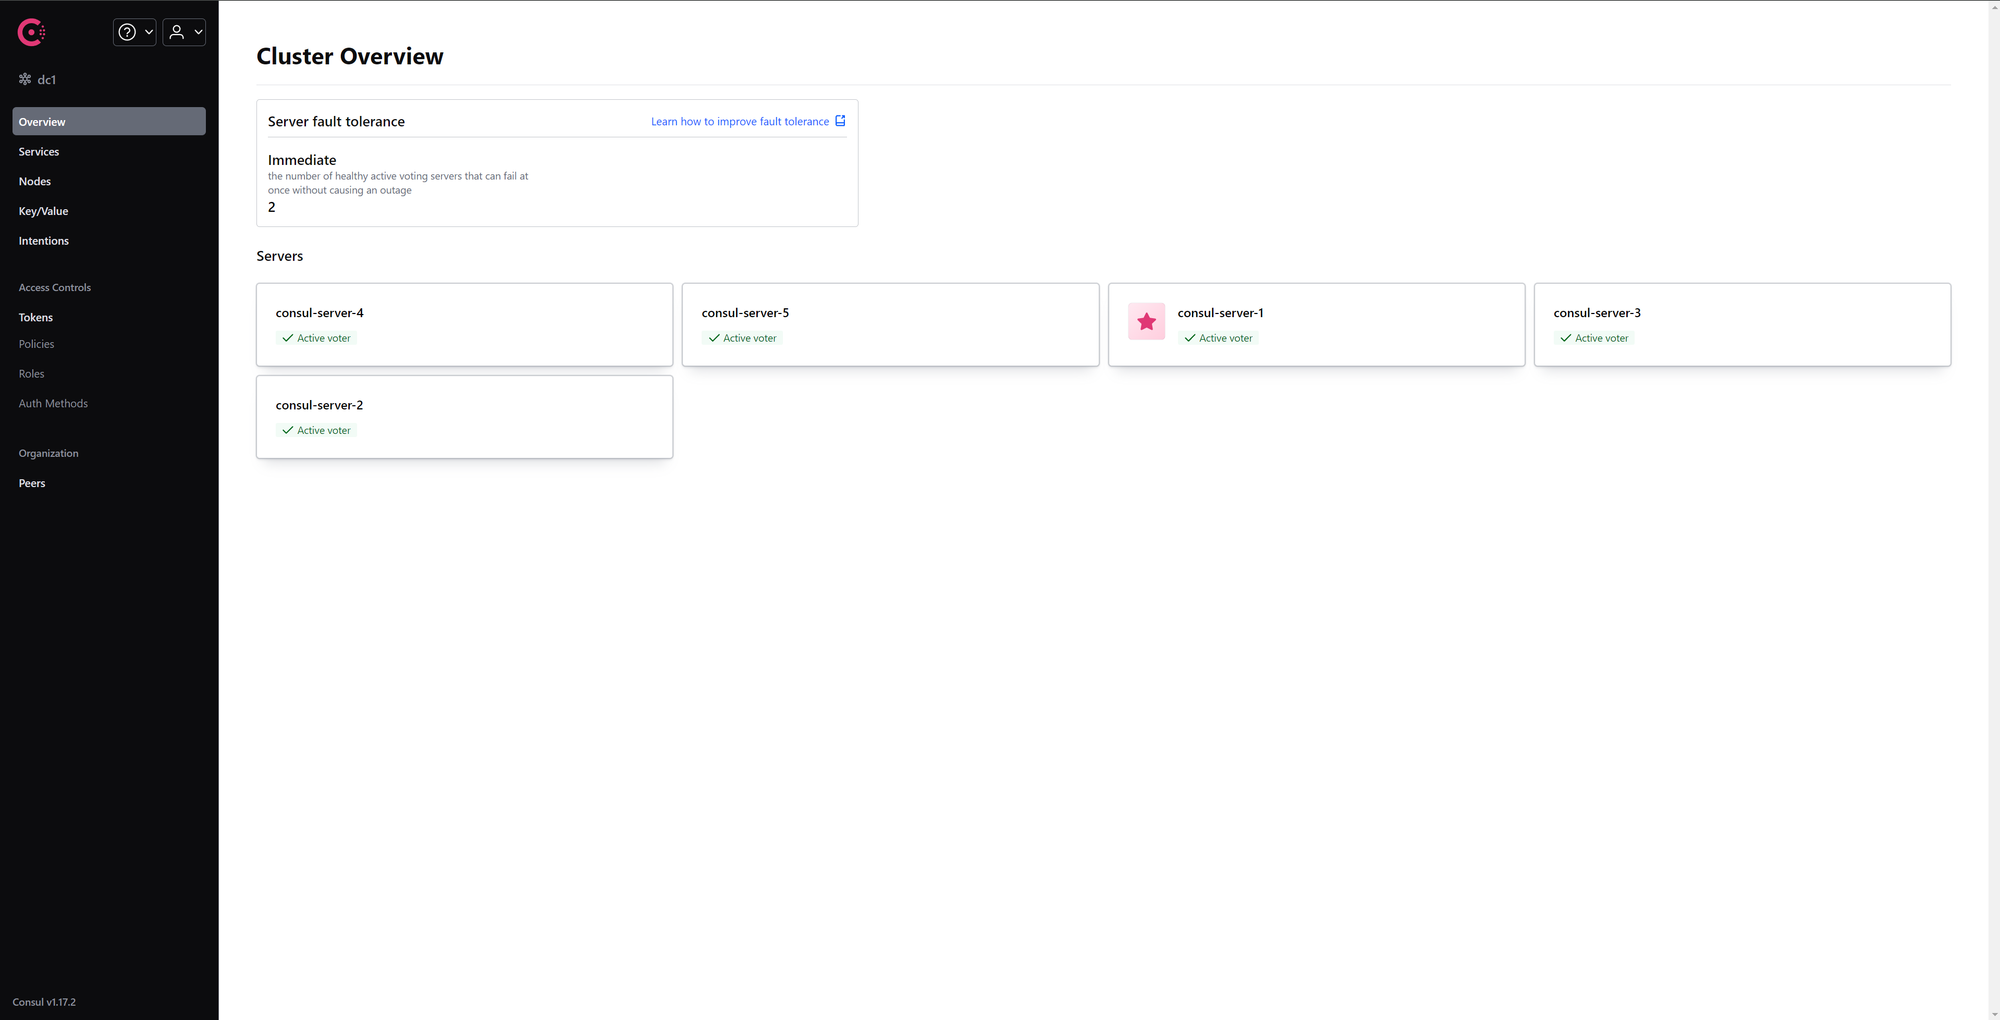
You have successfully enable TLS!
Next step
On the next course, we will learn how to secure access to the UI, API, CLI, service communications, and agent communications using Access Control Lists (ACLs)

Lenstra helps companies leverage Computer Science to enhance their Economic Performance
Contact us for a free consultancy to explore how we can work together.
Contact us