Hashicorp Consul 101 - Setup a cluster

In this course, we'll cover the fundamentals of Hashicorp Consul, starting with how to set up a cluster.
To better understand how this works in practice, let’s consider a hypothetical scenario with a company named Acme. We will use a docker-compose stack to quickly set up resources without the need of deploying a complete infrastructure. Stack template is available on Github:
 jeremychauvet
Step 1 - Setup a server
The first step will consist to review the Consul server configuration, and start it using docker-compose.
Let's review the key parts of the configuration file, with some annotations:
{
  "node_name": "consul-server-1", # Logical name in the cluster
  "server": true, # if false, this agent will be a client.
  "bootstrap": true, # only apply this parameter to one server!
  "retry_join": [ # Nodes that should be in the cluster.
    "consul-server-1" # Docker alias for the container IP.
  ],
  "ui_config": {
    "enabled": true # Enables HTTP console.
  },
  "datacenter": "dc1", # Forget that for the moment.
  "data_dir": "/consul/data", # Path used by Consul to store datas.
  "addresses": {
    "http": "0.0.0.0"
  }
}
The server is declared in the docker-compose.yml file as the following:
version: '3.7'

services:
  consul-server-1:
    image: hashicorp/consul:1.17
    container_name: consul-server-1
    volumes:
      - ./config/consul-server-1-config.json:/consul/config/server.json:ro
    networks:
      - acme_private_network
    ports:
      - "8501:8500"
      - "8601:8600/tcp"
      - "8601:8600/udp"
    command: "agent"

networks:
  acme_private_network:
This code will create a server named `consul-server-1`, using the configuration we previously reviewed. Some ports are exposed to be able to interact with the Consul server in the container.
You can now start our first Consul server, using the following command:
# Path: showroom-hashicorp-consul/101_create_a_cluster/start-state
$ docker-compose up -d

# Output:
[+] Running 2/2
 ✔ Network start-state_acme_private_network  Created
 ✔ Container consul-server-1                 Started
Server will be available at the following address: http://localhost:8501
Step 2 - Setup more servers
We have successfully setup and start our first Consul server! To create a cluster, we need to add more servers. In this section, we will add 4 more (total of 5) to have a vault tolerance of 2 nodes, which is a best practice.
Using the same docker-compose file, add 4 more servers. You can copy-paste the code from this source:
jeremychauvetDon't forget the servers configuration files
jeremychauvetAnd change the server 1 configuration to include the newly added servers:
{
  "node_name": "consul-server-1",
  "server": true,
  "bootstrap": true,
  "retry_join": [
    "consul-server-1",
    "consul-server-2",
    "consul-server-3",
    "consul-server-4",
    "consul-server-5"
  ],
  "ui_config": {
    "enabled": true
  },
  "datacenter": "dc1",
  "data_dir": "/consul/data",
  "addresses": {
    "http": "0.0.0.0"
  }
}
Servers are basically running a pretty similar configuration, except ports and bootstrap parameter. This one must be set to true only on the server you want to be the first leader of the newly created cluster.
You can now start the servers 1 to 5:
# Path: showroom-hashicorp-consul/101_create_a_cluster/start-state
$ docker-compose up -d
Access consul-server-1 console using the following address: http://localhost:8501. All the nodes of the cluster must be displayed:
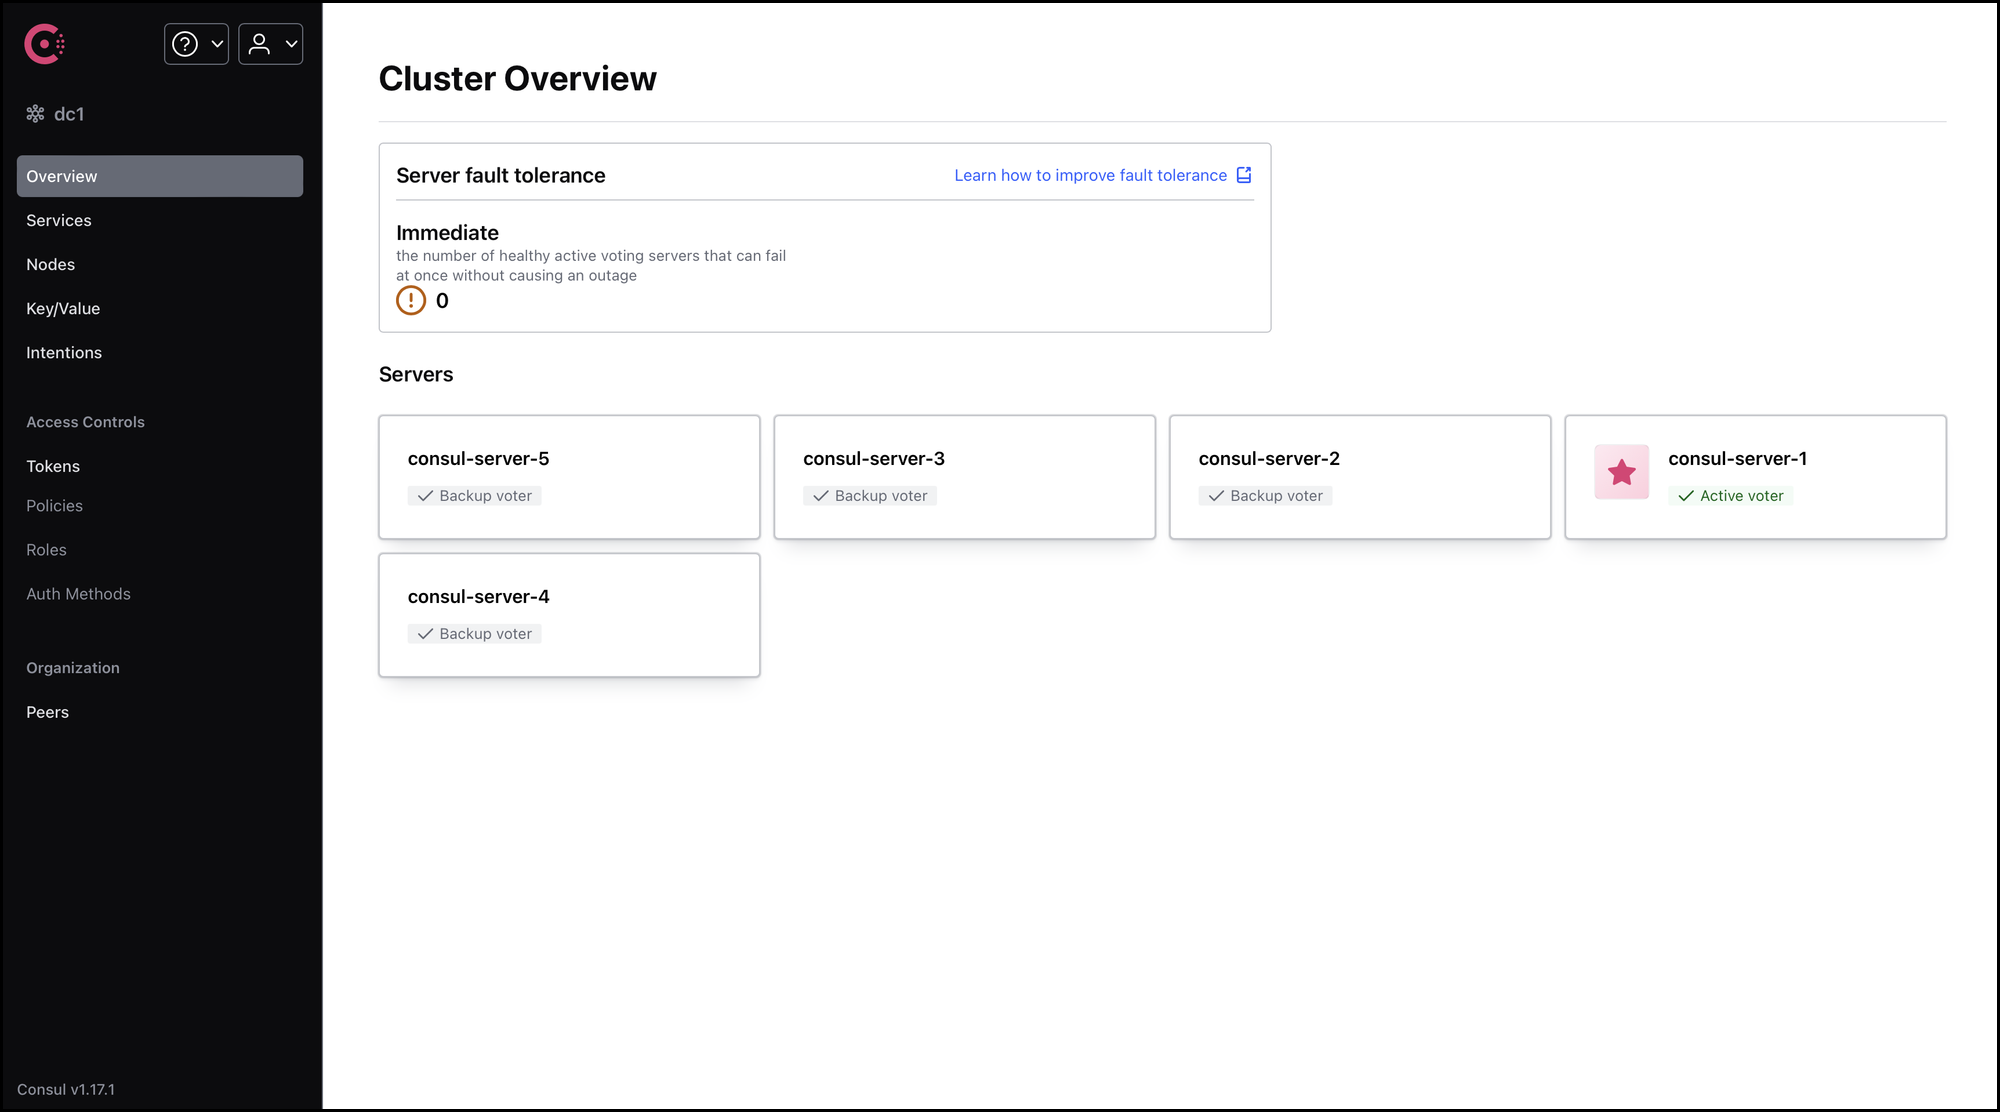
You have successfully deployed a cluster of 5 Consul servers!
On the next course, we will learn how to secure cluster communication using gossip encryption:
 Jeremy Chauvet

Lenstra helps companies leverage Computer Science to enhance their Economic Performance
Contact us for a free consultancy to explore how we can work together.
Contact us